
Created on September 14th, 2026 at 06:30 am
Table of Contents
Introduction: Chocolate Malt Layer Cake
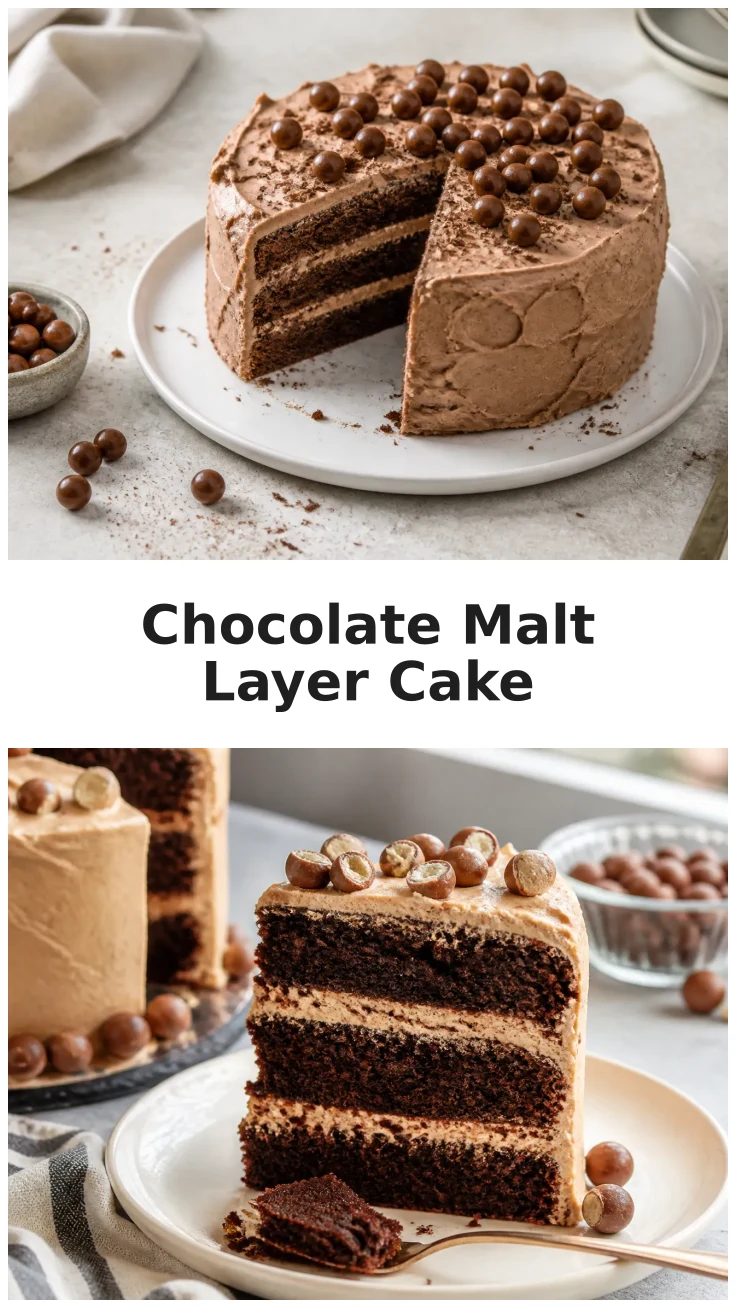
There’s something undeniably special about a well-crafted cake, and our Chocolate Malt Layer Cake is no exception. This decadent dessert combines the rich flavors of moist chocolate cake with the unique taste of chocolate malt buttercream, creating a truly bakery-style cake that’s perfect for any celebration.
Whether you’re hosting a party, celebrating a birthday, or simply indulging in a sweet treat, our layered cake recipe will guide you through crafting a crowd-pleasing masterpiece. The Chocolate Malt Layer Cake is more than just a dessert; it’s a centerpiece that brings joy and delight to any gathering.
Why Chocolate Malt Layer Cake is a Celebration Favorite
The Chocolate Malt Layer Cake offers a nostalgic nod to malted milkshakes, bringing those classic diner flavors into a modern dessert form. Its layers of moist chocolate cake and creamy malt buttercream create a harmonious balance of flavors and textures that is both comforting and indulgent. This cake is a perfect choice for those who appreciate the rich and slightly nutty taste of malt paired with the timeless appeal of chocolate.
The Perfect Occasion for a Chocolate Malt Layer Cake
This cake is versatile enough to suit any celebration. Its elegant appearance and irresistible flavor make it a standout choice for birthdays, anniversaries, and holiday gatherings. The Chocolate Malt Layer Cake is also a delightful addition to casual get-togethers or as a sweet surprise for someone special. No matter the occasion, this cake is sure to impress and satisfy.

Ingredients
Essential Ingredients for the Cake
To create this delightful cake, you’ll need a mix of pantry staples and a few specialty items. Key ingredients include all-purpose flour, cocoa powder, baking powder, baking soda, and malted milk powder. These elements come together to form the foundation of our moist chocolate cake layers.
Making the Chocolate Malt Buttercream
The chocolate malt buttercream is the star of this cake, offering a creamy, sweet, and slightly malty flavor profile. You’ll need unsalted butter, powdered sugar, cocoa powder, and malted milk powder to whip up this decadent frosting. The result is a smooth and luscious buttercream that perfectly complements the cake layers.
Optional Additions and Variations
For those who like to experiment, consider adding a layer of crushed malted milk balls between the cake layers for added texture. You could also incorporate a hint of espresso powder into the buttercream for an extra depth of flavor. These variations allow you to personalize the cake to suit your taste preferences.
Step-by-Step Instructions
Preparing the Cake Batter
Begin by preheating your oven to 350°F. In a large mixing bowl, combine the dry ingredients, including flour, cocoa powder, baking powder, and baking soda. In a separate bowl, cream together the butter and sugar until light and fluffy, then add the eggs one at a time. Gradually incorporate the dry ingredients into the wet mixture, alternating with milk and malted milk powder, until a smooth batter forms.
Baking and Cooling the Cake Layers
Divide the batter evenly between two greased and floured 9-inch round cake pans. Bake for approximately 25 to 30 minutes or until a toothpick inserted into the center comes out clean. Allow the cakes to cool in the pans for 10 minutes before transferring them to a wire rack to cool completely.
Assembling and Frosting the Cake
Once the cake layers are completely cool, level the tops if necessary. Place one cake layer on a serving plate and spread a generous amount of chocolate malt buttercream on top. Add the second layer and cover the entire cake with the remaining buttercream, smoothing the surface with a spatula. For a professional finish, use a piping bag to decorate the cake with extra buttercream swirls or rosettes.
Pro Tips
Mastering the art of cake baking can be a rewarding experience, and with a few expert tips, your Chocolate Malt Layer Cake will be a showstopper.
- Always use room temperature ingredients for a smoother batter and better cake texture.
- For an even bake, rotate your cake pans halfway through the baking time.
- Chill the cake layers before frosting to prevent crumbs from mixing into the buttercream.
- Use a crumb coat to seal in crumbs before applying the final layer of buttercream.
The most crucial tip is to ensure your buttercream is the right consistency. It should be soft enough to spread easily but firm enough to hold its shape. This balance is key to achieving a bakery-style cake finish.
Serving Suggestions
Pairing with Beverages
This rich and luscious cake pairs beautifully with a variety of beverages. For a classic option, serve with a cold glass of milk or a warm cup of coffee to balance the sweetness. If you’re feeling adventurous, try pairing it with a malted milkshake for a nostalgic twist.
Storing Leftovers
To keep your cake fresh, store it in an airtight container at room temperature for up to three days. If you prefer, you can refrigerate the cake for up to a week, but be sure to bring it back to room temperature before serving to enjoy its full flavor and texture.
Nutritional Information
Caloric Content and Serving Size
Indulging in a slice of Chocolate Malt Layer Cake is a treat worth savoring. Each slice contains approximately 320 calories, with a balance of carbohydrates, protein, and fat. While it’s a rich dessert, enjoying it in moderation makes it a delightful addition to your celebration.


Chocolate Malt Layer Cake

Equipment
- 1 9-inch round cake pan greased and floured
- 1 electric mixer
- 1 Mixing Bowl large
Ingredients
Dry Ingredients
- 2 cups all-purpose flour
- 1 cup granulated sugar
- 3/4 cup unsweetened cocoa powder
- 1 tsp baking powder
- 1/2 tsp baking soda
- 1/2 tsp salt
Wet Ingredients
- 1/2 cup unsalted butter softened
- 2 large eggs room temperature
- 1 cup whole milk
- 1/2 cup malted milk powder
Chocolate Malt Buttercream
- 1 cup unsalted butter softened
- 3 cups powdered sugar
- 1/2 cup unsweetened cocoa powder
- 1/4 cup malted milk powder
- 2 tbsp whole milk
- 1 tsp vanilla extract
Instructions
Preparation
- Preheat your oven to 350°F. In a large bowl, whisk together flour, cocoa powder, baking powder, baking soda, and salt. In another bowl, beat butter and sugar until creamy. Add eggs one at a time, mixing well after each addition.
- Gradually add the dry ingredients to the butter mixture, alternating with milk and malted milk powder. Mix until the batter is smooth and well combined.
- Divide the batter evenly between two greased and floured 9-inch cake pans. Bake for 25-30 minutes or until a toothpick inserted into the center comes out clean.
- Let the cakes cool in the pans for 10 minutes, then turn them out onto wire racks to cool completely.
- Beat the butter until creamy. Gradually add powdered sugar, cocoa powder, and malted milk powder, mixing on low speed. Add milk and vanilla extract and beat until the frosting is smooth and fluffy.
- Place one cake layer on a serving platter and spread a generous layer of buttercream on top. Add the second layer and cover the entire cake with the remaining buttercream. Smooth the surface with a spatula.
Serving
- Slice the cake into 8 equal pieces and serve at room temperature. Pair with your choice of beverage for a delightful treat.
Storage
- Store any leftover cake in an airtight container at room temperature for up to three days, or refrigerate for up to a week. Allow the cake to come to room temperature before serving.
Notes
FAQ
Can I make the cake layers in advance?
Yes, you can bake the cake layers in advance. Once they have cooled completely, wrap them tightly in plastic wrap and store them in the refrigerator for up to two days or freeze them for up to a month. Thaw the layers at room temperature before assembling and frosting the cake.
How can I ensure my buttercream is the right consistency?
To achieve the perfect buttercream consistency, ensure that your butter is softened but not melted. Gradually add the powdered sugar and other dry ingredients, mixing on low speed to prevent a powdery mess. If the buttercream seems too thick, add a teaspoon of milk at a time until it reaches a smooth and spreadable consistency.
What is the best way to level my cake layers?
To level your cake layers, use a serrated knife and carefully slice off the dome of each cake layer. Ensure that your knife is parallel to the countertop for even cuts. Alternatively, you can use a cake leveler for more precision. Leveling your cake ensures stability and even frosting application when stacking the layers.
Enjoyed this recipe? Leave a review!
There are no reviews yet. Be the first one to write one.

