
Created on October 26th, 2026 at 08:30 am
Table of Contents
Introduction: Witch Hat Cupcakes
The Perfect Halloween Treat
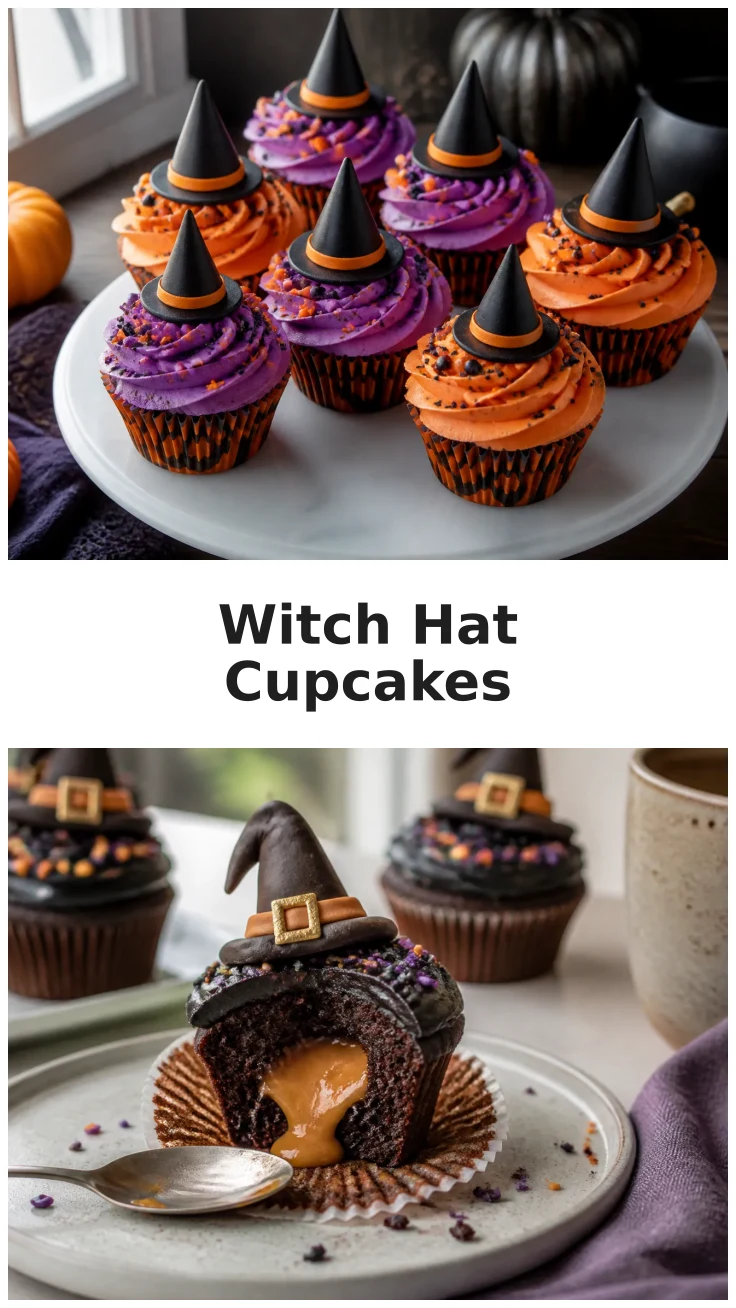
Witch Hat Cupcakes are the ultimate Halloween treat that combines creativity and flavor in one delightful dessert. These cupcakes are not only delicious but also serve as a fantastic addition to any spooky-themed party. With their whimsical design, they capture the essence of Halloween and are bound to impress both kids and adults alike.
These cupcakes are fun to make and even more fun to decorate. Perfect for a Halloween gathering, they offer a great way to bring a touch of magic to your dessert table. Whether you’re hosting a party or simply want to enjoy a treat with your family, these cupcakes are sure to be a hit.
Why Kids Love Them
Kids adore Witch Hat Cupcakes because they are not only tasty but also visually captivating. The colorful decorations and the idea of transforming a simple cupcake into a witch’s hat make the baking process exciting for little ones. Involving children in decorating these cupcakes can be a fun and educational activity, teaching them about creativity and the joy of baking.
The cupcakes are also customizable, allowing kids to express their individual artistic flair. They can choose different colors for the frosting, add sprinkles, or even create different shapes with the fondant. This makes the baking process a delightful experience for kids, fostering their imagination and love for cooking.

Love baking cakes like this one? 🎂
Get our newest cake recipes and seasonal baking ideas in your inbox every week. Free, no spam, unsubscribe anytime. See our Privacy Policy.
Ingredients
Cupcake Base Ingredients
To make the perfect Witch Hat Cupcakes, you’ll need a combination of classic cupcake ingredients and a few special additions to bring the magic alive. Here’s a list of what you’ll need:
- 1 1/2 cups all-purpose flour
- 1 cup granulated sugar
- 1/2 cup unsalted butter, softened
- 2 large eggs
- 1/2 cup milk
- 1 teaspoon vanilla extract
- 1 1/2 teaspoons baking powder
- 1/4 teaspoon salt
These ingredients come together to create a moist and fluffy cupcake base that serves as the perfect canvas for your witch-themed decorations.
Decorative Elements
For the witch hats, you’ll need some creative ingredients to bring these cupcakes to life:
- Chocolate sugar cones
- Black fondant
- Colored icing (green, orange, purple)
- Sprinkles and edible glitter
- Mini marshmallows
These elements are essential for transforming a simple cupcake into a whimsical witch hat. Feel free to explore more creative options like edible googly eyes or candy spiders.
For those with dietary restrictions, you might want to explore Gluten Free Carrot Cake Cupcakes for more alternatives.
Step-by-Step Instructions
Baking the Cupcakes
To start, preheat your oven to 350°F and line a muffin tin with cupcake liners. In a large bowl, cream together the butter and sugar until light and fluffy. Add in the eggs, one at a time, followed by the vanilla extract. In another bowl, sift together the flour, baking powder, and salt. Gradually mix the dry ingredients into the wet mixture, alternating with the milk. Stir until just combined.
Fill each cupcake liner about two-thirds full with the batter. Bake for 18-20 minutes, or until a toothpick inserted into the center comes out clean. Allow the cupcakes to cool completely before proceeding to decoration.
For chocolate lovers, our Vegan Chocolate Cupcakes might offer some exciting variation ideas.
Creating the Witch Hats
While your cupcakes are cooling, start preparing the witch hats. Roll out the black fondant and cut into small circular shapes to fit the base of the sugar cones. Attach the fondant to the cone using a dab of icing, ensuring it covers the entire base. Decorate the cones with colored icing and sprinkles to mimic a witch’s hat.
Get creative with your designs, using different colors and patterns to give each hat its own unique personality. This step is where you can really let your imagination run wild.
Assembling the Cupcakes
Once your cupcakes are cooled and the witch hats are ready, it’s time to assemble. Pipe a generous swirl of colored frosting on each cupcake. Carefully place a prepared witch hat on top of the frosting, ensuring it sits securely.
For added stability, you can insert a toothpick through the hat and into the cupcake. Finish off by adding more decorative elements like sprinkles or edible glitter around the hat.
Pro Tips
Creating the perfect Witch Hat Cupcakes requires a few insider tips to ensure success. Here are some expert suggestions:
- Use room temperature ingredients for a smoother batter.
- Chill the cupcakes before frosting for a more stable base.
- Experiment with different icing colors to match your party theme.
- Prep the witch hats in advance to save time on the day of your event.
One of the most critical tips is to ensure your cupcakes are fully cooled before frosting. This helps the frosting to stay in place and prevents it from melting. Check out our Mini Chocolate Cupcakes for more tips on perfecting your cupcake base.
Love baking cakes like this one? 🎂
Get our newest cake recipes and seasonal baking ideas in your inbox every week. Free, no spam, unsubscribe anytime. See our Privacy Policy.
Serving Suggestions
Pairing with Other Halloween Treats
Witch Hat Cupcakes are delightful on their own, but they shine even more when paired with other Halloween-themed treats. Consider serving them alongside Santa Hat Cupcakes for a whimsical contrast or create a dessert table with a variety of spooky desserts like ghost cookies or candy corn trifle.
Complement your dessert selection with savory Halloween snacks to balance the flavors and keep your guests satisfied throughout the party.
Presentation Tips for Parties
Presentation is key when it comes to party treats. Arrange your Witch Hat Cupcakes on a tiered stand to create a stunning centerpiece for your dessert table. Use themed decorations like spiderwebs or mini pumpkins to enhance the spooky atmosphere.
Consider personalized cupcake toppers with guests’ names or Halloween-themed messages to add a special touch. This attention to detail can turn a simple cupcake into a memorable party highlight.
Nutritional Information
Caloric Content and Serving Size
Each Witch Hat Cupcake is approximately 320 calories, making it a reasonable indulgence for a festive occasion. With about 48 grams of carbohydrates, 5 grams of protein, and 13 grams of fat, these cupcakes provide a balanced treat that won’t weigh you down.
Although they are a dessert, these cupcakes can fit into a balanced diet when enjoyed in moderation. Remember to consider portion sizes and balance them with healthier options throughout the day.


Witch Hat Cupcakes

Equipment
- 1 muffin tin lined with cupcake liners
- 1 electric mixer
- 1 piping bag
Ingredients
Cupcake Ingredients
- 1 1/2 cups all-purpose flour
- 1 cup granulated sugar
- 1/2 cup unsalted butter softened
- 2 large eggs
- 1/2 cup milk
- 1 teaspoon vanilla extract
- 1 1/2 teaspoons baking powder
- 1/4 teaspoon salt
Decorative Elements
- 12 chocolate sugar cones
- Black fondant
- Colored icing green, orange, purple
- Sprinkles and edible glitter
- Mini marshmallows
Instructions
Preparation
- Preheat oven to 350°F. Line a muffin tin with cupcake liners. In a large bowl, cream together butter and sugar until light and fluffy. Add eggs one at a time, then vanilla. In another bowl, sift flour, baking powder, and salt. Alternately add dry ingredients and milk to the butter mixture. Fill liners two-thirds full and bake for 18-20 minutes. Let cool completely.
- Roll out black fondant and cut into small circles to fit the base of sugar cones. Attach fondant to cones using icing. Decorate cones with colored icing and sprinkles. Allow to set.
Serving
- Pipe a swirl of frosting on each cooled cupcake. Place a prepared witch hat on top, ensuring it sits securely. Add decorative elements like sprinkles or edible glitter.
Storage
- Store cupcakes in an airtight container at room temperature for up to 3 days. For longer storage, keep in the refrigerator for up to a week.
Notes
FAQ
Can I make witch hat cupcakes ahead of time?
Yes, you can make the cupcakes a day in advance. Store them in an airtight container at room temperature. The witch hats can also be prepared a day earlier and added to the cupcakes right before serving. This allows you to save time on the day of your event and ensures that your cupcakes remain fresh and delicious.
What can I use instead of fondant for the witch hats?
If you prefer not to use fondant, you can substitute it with melted chocolate. Simply dip the sugar cones in melted chocolate and allow them to set. This will create a similar effect and add a rich chocolate flavor to your cupcakes. You can also use colored candy melts for a more vibrant look.
Enjoyed this recipe? Leave a review!
There are no reviews yet. Be the first one to write one.

