Created on May 3rd, 2026 at 05:15 am
Table of Contents
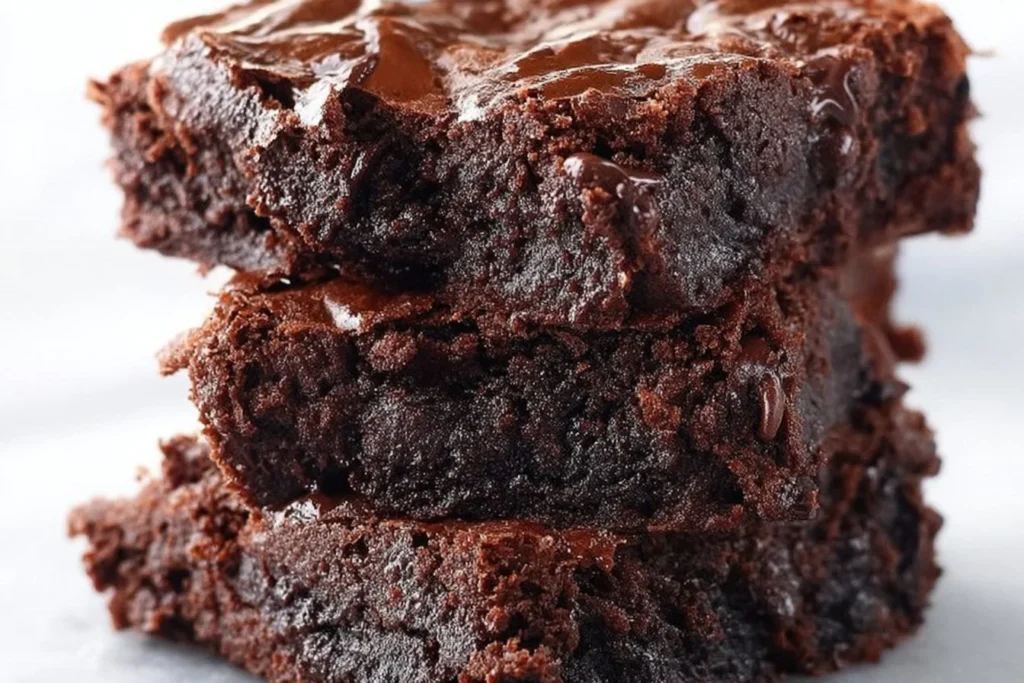
Introduction to Blackout Brownies
Welcome to the ultimate guide for making blackout brownies, a dessert that’s perfect for any chocolate lover. These rich, fudgy brownies are a classic treat that combines the deep flavors of dark chocolate with a moist, melt-in-your-mouth texture.
In this article, we’ll explore the uniqueness of blackout brownies, their history, and why this easy brownie recipe is a must-try for homemade brownies enthusiasts. Get ready to dive into the world of decadent desserts!
What Makes Blackout Brownies Unique?
Blackout brownies stand out due to their intense chocolate flavor and incredibly fudgy texture. Unlike typical chocolate brownies, these homemade brownies are made with a higher ratio of chocolate to flour, resulting in a richer, denser dessert. They’re the perfect choice for those who prefer a more indulgent treat.
History and Origin of Blackout Brownies
The name ‘blackout brownies’ is believed to have originated in Brooklyn, where a famous bakery created a cake with multiple layers of chocolate and pudding. Over time, this concept evolved into the brownies we know today, maintaining the same level of chocolate decadence in a more convenient form.
Why You’ll Love This Recipe
This easy brownie recipe is ideal for bakers of all skill levels. With simple ingredients and straightforward steps, you can recreate the magic of blackout brownies at home. The result is a dessert that’s perfect for any occasion, from casual gatherings to special celebrations.

Ingredients for Blackout Brownies
To make these delicious blackout brownies, you’ll need a selection of both essential and optional ingredients. This section will guide you through everything required to achieve the perfect fudgy brownies.
Essential Ingredients
The key ingredients for blackout brownies include high-quality dark chocolate, unsalted butter, sugar, eggs, vanilla extract, flour, and cocoa powder. These components come together to create the rich texture and flavor that define this dessert.
Optional Add-ins for Extra Flavor
For those looking to experiment with flavors, consider adding nuts, chocolate chips, or even a swirl of peanut butter. These additions can elevate your brownies, providing a unique twist to the classic recipe.
Substitutions and Variations
If you’re catering to specific dietary needs, there are various substitutions you can make. For instance, you can use gluten-free flour or replace butter with coconut oil for a different taste and texture.
For more variations, check out our Easy Chocolate Brownies recipe.
Step-by-Step Instructions
Creating the perfect blackout brownies is all about following the right steps. This section will guide you through the entire process, ensuring your brownies come out perfectly every time.
Preparing Your Baking Tools
Before you begin, gather your tools: a 9×13 inch baking pan, parchment paper, mixing bowls, and an electric mixer. Preheat your oven to 350°F and line your baking pan with parchment paper for easy removal of the brownies.
Mixing the Batter
Start by melting the chocolate and butter together until smooth. In a separate bowl, whisk the eggs and sugar until light and fluffy. Combine the chocolate mixture with the egg mixture, then fold in the dry ingredients. Ensure everything is well incorporated for a smooth batter.
Baking to Perfection
Pour the batter into the prepared pan and bake for 25-30 minutes, or until a toothpick inserted into the center comes out with a few moist crumbs. Allow the brownies to cool completely in the pan before slicing.
For those who prefer a more classic approach, consider trying our Fudgy Homemade Brownies Recipe.

Pro Tips
Creating the perfect blackout brownie requires attention to detail. Follow these pro tips to enhance your baking experience.
- Use high-quality chocolate for the best flavor.
- Do not overmix the batter to maintain a fudgy texture.
- Allow the brownies to cool completely before cutting to avoid crumbling.
- Store brownies in an airtight container to maintain freshness.
The most important tip is to use room temperature eggs. This helps the batter emulsify properly, resulting in a smoother texture.
For more tips on maintaining freshness, visit our Moist Homemade Brownies Recipe.
Serving Suggestions
Blackout brownies are versatile and can be enjoyed in numerous ways. Here are some serving suggestions to enhance your dessert experience.
Pairing with Ice Cream and Other Desserts
Serve your brownies warm with a scoop of vanilla ice cream or whipped cream. For a more extravagant dessert, drizzle with chocolate or caramel sauce. This combination creates a delightful contrast of temperatures and textures.
Perfect Occasions for Blackout Brownies
Whether it’s a birthday, holiday, or casual get-together, blackout brownies are a crowd-pleaser. Their rich flavor and indulgent texture make them a standout choice for any dessert table.
For more dessert ideas, check out the Pecan Pie Dump Cake.


Blackout Brownies
Equipment
- 1 9×13 inch baking pan lined with parchment paper
- 1 electric mixer
- 1 Mixing bowls large and medium
Ingredients
Dry Ingredients
- 1 cup all-purpose flour
- 1/4 cup cocoa powder
- 1/2 tsp salt
Wet Ingredients
- 1 cup granulated sugar
- 1/2 cup unsalted butter
- 2 large eggs
- 1 tsp vanilla extract
- 8 oz dark chocolate chopped
Instructions
Preparation
- Preheat your oven to 350°F. Line a 9×13 inch baking pan with parchment paper and set aside.
- In a heatproof bowl, melt the chopped dark chocolate and unsalted butter together over a pot of simmering water, stirring until smooth. Remove from heat and let cool slightly.
- In a separate bowl, whisk together the flour, cocoa powder, and salt until well combined.
- In a large mixing bowl, whisk the eggs and granulated sugar using an electric mixer on medium speed until light and fluffy.
- Gradually add the melted chocolate mixture and vanilla extract to the egg mixture, beating until smooth.
- Fold the dry ingredients into the wet ingredients using a spatula, mixing gently until just combined.
- Pour the batter into the prepared baking pan, spreading it evenly with a spatula.
- Bake in the preheated oven for 25-30 minutes, or until a toothpick inserted into the center comes out with a few moist crumbs.
- Allow the brownies to cool in the pan on a wire rack. Once cooled, cut into squares and serve.
- Store leftovers in an airtight container at room temperature for up to 4 days.
Notes
Ingredient Substitutions: Substitute butter with coconut oil for a different flavor.
How to Serve: Pair with vanilla ice cream for a delightful treat.
Storage & Freshness: Store in an airtight container to maintain freshness.
Make-Ahead Tips: Prepare the batter in advance and refrigerate for up to 24 hours before baking.
FAQ
Can I make blackout brownies gluten-free?
Yes, you can make blackout brownies gluten-free by substituting the all-purpose flour with a gluten-free flour blend. Ensure the blend is suitable for baking and includes a binding agent like xanthan gum to maintain the structure of the brownies. This simple substitution allows you to enjoy the rich, fudgy texture of blackout brownies without the gluten.
How do I achieve a fudgy brownie texture?
To achieve a fudgy brownie texture, focus on the ratio of ingredients. Use a higher amount of chocolate and butter compared to flour. Avoid overbaking; the brownies should be slightly underdone when removed from the oven, as they will continue to set as they cool. Additionally, use room temperature eggs to help create a smooth and cohesive batter.