Created on June 7th, 2025 at 02:00 pm
Table of Contents
The first time I baked a smash cake, it was for my daughter Lily’s first birthday. I still remember her little face lighting up when we placed the mini cake in front of her. She didn’t just eat it—she explored it, with frosting on her nose, cake in her curls, and the biggest, messiest grin. As a cake maker and mom, I knew this wasn’t just dessert—it was a memory. That’s the magic of a smash cake. Tiny, adorable, and made for smashing, they’re the perfect treat for celebrating your baby’s big milestone.
In this article, I’ll show you exactly how to make your own smash cake from scratch—whether you’re a first-time baker or a seasoned mom. We’ll cover what makes a smash cake special, how big it should be, flavor and frosting ideas that are toddler-safe, and simple decorating tips for photo-perfect results. You’ll also find helpful tips pulled from our most popular baby-friendly recipes like Greek Yogurt Cake and Lunchbox Cakes. Let’s get into it!

Smash Cakes Tradition
What Makes a Cake a Smash Cake?
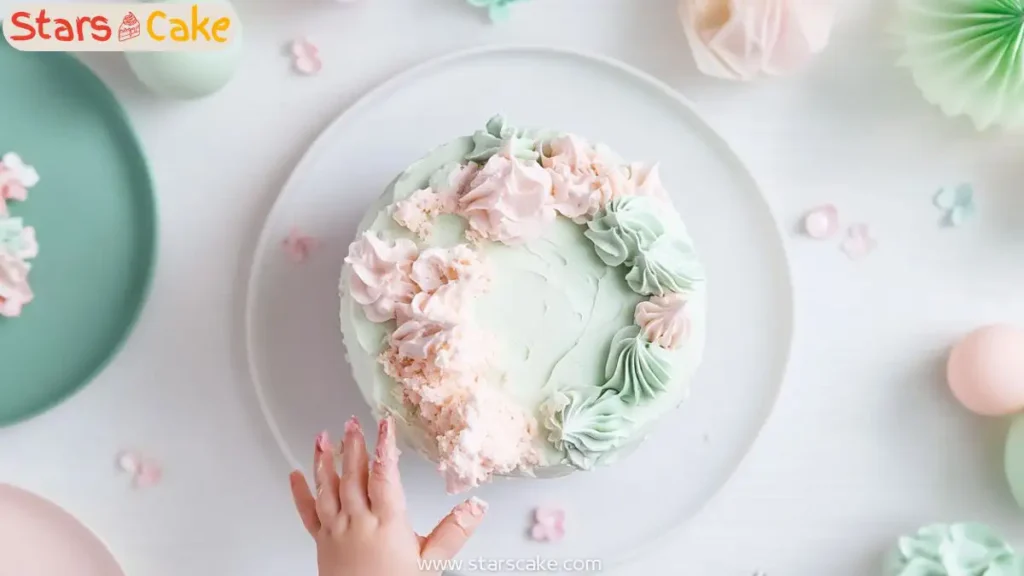
A smash cake are a small, often one-layer or two-layer cake made especially for a baby’s first birthday. It’s meant to be “smashed” by little hands, creating a joyful (and usually messy) moment that’s perfect for photos. What sets it apart from a regular cake isn’t just the size—it’s also about safety. Smash cakes are made with gentle ingredients, lower sugar, and often skip artificial dyes or strong flavors.
You’ll commonly find them frosted with whipped cream, Greek yogurt, or lightly sweetened cream cheese. Unlike tiered birthday cakes, these are simple and soft. They’re easy to break apart with tiny fingers, making them ideal for your baby to explore safely. If you’ve seen our Happy Birthday Cake, imagine a mini version that’s gentler on tiny tummies!
A Sweet First Birthday Tradition
More than just a baking trend, the smash cake has become a first birthday ritual in many families. It’s not just about sugar or style—it’s about letting your baby engage all their senses. Tasting, touching, and, yes, smashing! Parents often pair it with a beautiful “cake smash” photo shoot, a keepsake that captures this fleeting stage.
The best part? You don’t need pro baking skills. You just need a little time, a few key ingredients, and some creativity. At StarsCake, we believe every busy parent should feel confident baking a cake from scratch, and this one is perfect for beginners. Inspired by our readers’ love for recipes like the Bluey Cake and Protein Mug Cake, we’ll show you how to make it quick, fun, and truly special.
How to Make a Smash Cake at Home

Ingredients and Tools for a Baby-Friendly Smash Cake
To make homemade smash cakes that are soft, safe, and super cute, you don’t need fancy tools or hard-to-find ingredients. This recipe creates one 4 to 6-inch baby-sized cake—just right for those adorable messy moments.
Ingredients:
- 1 cup all-purpose flour (or oat flour for a softer texture)
- 1 large ripe banana, mashed (for sweetness and moisture)
- 1 egg
- 1 teaspoon baking powder
- 1/4 cup unsalted butter (or coconut oil), melted
- 1/4 cup milk (dairy or oat/almond milk)
- 1 teaspoon vanilla extract (optional)
Tools:
- 4-inch or 6-inch round cake pan
- Mixing bowl
- Whisk or spoon
- Rubber spatula
- Non-stick spray or butter for greasing
- Wire cooling rack
This recipe is naturally lower in sugar, making it perfect for a first birthday moment. For two layers, just double the recipe or slice your cake horizontally once it’s cooled.

Step-by-Step Instructions for Baking Smash Cakes
Step 1: Prep the pan and oven
Preheat your oven to 350°F (175°C). Grease your mini cake pan with non-stick spray or line it with parchment paper to make the cake easy to remove later.
Step 2: Mix the wet ingredients
In a mixing bowl, mash the banana until smooth. Add the egg, melted butter, milk, and vanilla. Whisk until everything is well combined.
Step 3: Add the dry ingredients
Sprinkle in the flour and baking powder. Use a spatula to gently fold the mixture until just combined. Be careful not to overmix—it should look thick and slightly lumpy.
Step 4: Fill the pan and bake
Pour the batter into the prepared pan. Tap the pan lightly on the counter to level the batter. Bake for 18–22 minutes, or until the top is golden and a toothpick inserted in the center comes out clean.
Step 5: Cool the cake
Remove from the oven and let it sit for 5 minutes. Then transfer the cake to a wire rack and allow it to cool completely before frosting or decorating.
If you loved the simplicity of this bake, you’ll also enjoy the baby-approved Protein Mug Cake, which uses similar ingredients in microwave form!
Smash Cakes Flavor and Frosting Ideas
Toddler-Friendly Flavors That Are Safe and Delicious
When it comes to flavor, smash cakes are all about balancing baby-safe ingredients with textures little hands love. While chocolate or heavy fillings are better saved for grown-ups, you can still make flavors that taste amazing using natural ingredients.
Some favorites include banana, vanilla, apple-cinnamon, and even a touch of carrot. These gentle flavors not only smell comforting when baking but also introduce your baby to new tastes. You can swap sugar for mashed banana, applesauce, or date puree. They’re naturally sweet and provide great moisture.
Want something creamy in the mix? Blend in full-fat Greek yogurt like we use in our Greek Yogurt Cake. It gives your batter a tender, light crumb while keeping things nutritious. Or add a dash of pumpkin purée for a fall-inspired twist!
If your little one has allergies, oat flour or almond flour are easy substitutes for wheat flour, and unsweetened plant-based milk (like oat or coconut) works great too.
Frosting Ideas That Are Soft, Sweet, and Natural
Frosting for smash cakes doesn’t have to be sugary to be sweet. Babies don’t need the typical buttercream swirl, and truthfully, they love the texture more than the taste! The best options are soft, creamy, and safe—even if baby gets a big mouthful.
Here are 3 easy frosting options:
- Whipped Cream – Beat heavy cream until fluffy, then add a touch of vanilla. Soft and airy, it’s easy to smash and gentle on tiny tummies.
- Greek Yogurt – Mix full-fat Greek yogurt with a bit of fruit purée for a natural color and sweetness. We used this idea in our Lunchbox Cake and it photographs beautifully.
- Cream Cheese Blend – Whip together cream cheese and applesauce for a mellow tang with extra smoothness.
Avoid artificial food coloring. For beautiful natural shades, try mashed blueberries (purple), strawberries (pink), or even spinach (mint green). Use frosting sparingly if baby’s sensitive to dairy—or go fully dairy-free using whipped coconut cream.
Remember, the goal isn’t perfection. It’s a cake made to be joyfully destroyed! A messy swirl of creamy topping is more than enough.
Decorating and Serving Smash Cakes for Picture-Perfect Moments

Cake Decorating Tips for Beginners
The beauty of smash cakes is that they don’t have to look perfect—they just need to look smashable! Whether you’re going for a rustic swirl or a soft pastel ombré, keep it simple and fun. Your baby is the star of the show—not the piping.
Start by applying a thin layer of frosting (yogurt or whipped cream works beautifully). This is your crumb coat. Chill the cake for 10–15 minutes, then add a thicker, swoopy layer on top. If you want a touch of color, blend in fruit purées like strawberries or blueberries for natural tints.
Need a little flair? Top the cake with:
- A mini cake topper with baby’s name or “one”
- Fresh berries or a swirl of mashed fruit
- Edible flowers (like pansies or violets—safe and beautiful!)
- A dollop of whipped cream in the center
If you’re feeling inspired, peek at how we styled the Bluey Cake with simple color themes and child-friendly decorations. That same gentle approach works great for smash cakes too.
Don’t forget to keep allergens in mind. Skip nuts, honey (for under 1 year), and anything that could pose a choking hazard like hard sprinkles or whole berries.
How to Serve Smash Cakes (Without the Stress!)
Now comes the fun (and slightly messy) part: serving smash cakes. Most parents choose to do this just before the party starts or during a first birthday photo shoot. Here’s how to make it smooth and joyful for everyone:
- Place the cake on a low table or highchair tray. A white background or simple fabric makes photos pop.
- Keep a warm, damp washcloth nearby for quick clean-up.
- Strip your little one down to a diaper or dress them in a cute onesie you don’t mind staining.
- Get the camera ready, take a deep breath—and let them explore!
For even easier cleanup, lay down a splat mat or sheet under the highchair. You can even freeze the cake for 10 minutes before serving so it holds its shape a bit longer for those early photo moments.
And don’t worry—if baby doesn’t smash right away, that’s normal! Some poke, some taste gently, and some go full face-first. However they do it, it’s their moment. Let it unfold naturally.
This is a celebration of joy, not perfection. If you’re also baking a full-size birthday treat for guests, our Kunafa Cake or Pickle Cake make bold, conversation-starting choices!
FAQ
What is a smash cake?
A smash cake is a small, baby-friendly cake made for a child’s first birthday. It’s designed for the baby to “smash” into with their hands, face, or spoon—creating a joyful, messy, and photo-ready celebration.
How big is a smash cake?
Most smash cakes are 4 to 6 inches wide and about 2 to 3 inches tall. They’re perfectly sized for tiny hands and short attention spans.
How to make a smash cake?
Make a small cake using baby-safe ingredients like mashed banana, flour, and yogurt. Bake it in a 4-inch or 6-inch pan, frost with whipped cream or Greek yogurt, and let your baby explore it!
What makes a cake a smash cake?
Smash cakes are smaller, softer, and made with fewer sweeteners than regular cakes. They’re designed to be smashed, eaten, and played with—perfect for capturing baby’s first birthday in a fun, interactive way.
Are smash cakes 2 or 3 layers?
Most smash cakes are one or two layers. Three layers can be done for dramatic effect, but it’s often best for styled photo shoots. One layer is plenty for most babies!

