
Created on October 21st, 2026 at 06:30 am
Table of Contents
Introduction: Dot Cake
Welcome to the world of dot cakes, a delightful and playful addition to any celebration. These cakes are not only a feast for the taste buds but also a visual treat, with colorful dots that add a whimsical charm. Whether it’s a birthday, an anniversary, or just a fun get-together, a dot cake is sure to steal the show.
The trend of dot cakes has taken the cake decorating world by storm, offering endless possibilities for creativity and personalization. In this detailed guide, we’ll walk you through the process of making a dot cake from scratch, sharing tips to achieve that perfect finish and ideas for making it your own.
What is a Dot Cake?
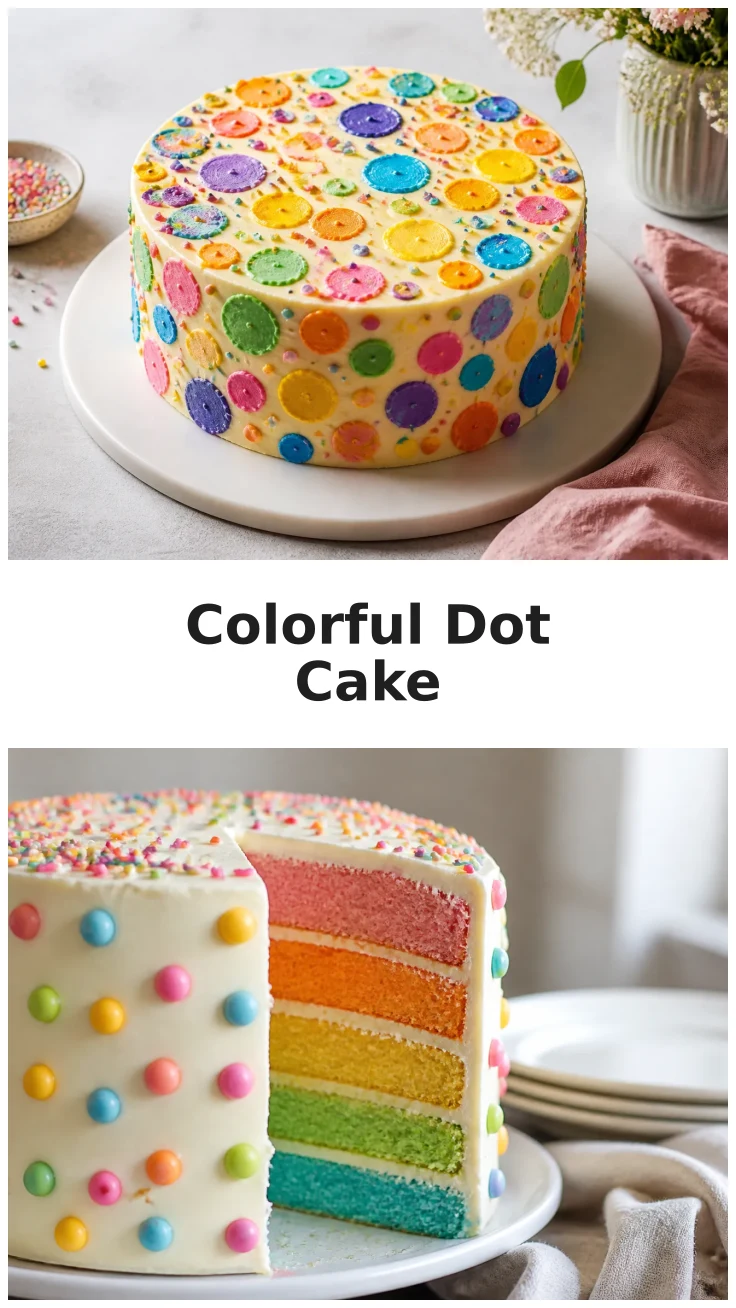
A dot cake is essentially a classic cake covered or adorned with colorful dots made from icing or fondant. These dots can be arranged in patterns or scattered randomly to create a playful look. The concept is simple, yet it allows for a great deal of creativity in terms of colors, sizes, and arrangements.
The Popularity of Dot Cakes in Celebrations
Dot cakes have become increasingly popular as they offer a unique way to personalize cakes for various celebrations. Their vibrant appearance makes them perfect for birthdays, gender reveals, and even wedding receptions. The ability to customize the colors to match any theme or occasion adds to their appeal.

Love baking cakes like this one? 🎂
Get our newest cake recipes and seasonal baking ideas in your inbox every week. Free, no spam, unsubscribe anytime. See our Privacy Policy.
Ingredients
Essential Ingredients for a Dot Cake
The key to a great dot cake lies in its ingredients, which should be fresh and of high quality. For the cake base, you’ll need all-purpose flour, baking powder, unsalted butter, sugar, eggs, vanilla extract, milk, and a pinch of salt. For the dots, you can use either icing or fondant, along with food coloring to achieve your desired shades.
Choosing the Right Colors for Your Dots
Selecting colors for your dots is a fun part of the process. Consider the occasion and the mood you want to set. Bright, bold colors work well for children’s parties, while pastels might be more suited for a bridal shower. Mixing and matching different shades can create an eye-catching effect.
Step-by-Step Instructions
Preparing the Cake Base
Start by preheating your oven to 350°F and greasing a 9-inch round cake pan. In a large mixing bowl, combine the dry ingredients: flour, baking powder, and salt. In another bowl, cream the butter and sugar until light and fluffy, then add the eggs one at a time, followed by the vanilla extract. Gradually mix in the dry ingredients, alternating with milk until the batter is smooth.
Creating and Applying the Dots
Divide your icing or fondant into separate bowls and add different food colors to each. Roll fondant into small balls, or pipe dots of icing onto parchment paper if using icing. Once your cake has cooled, apply a thin layer of frosting to the cake’s surface. Arrange the dots in your desired pattern and gently press them into the frosting.
Final Touches for a Perfect Finish
To achieve a professional look, use a cake smoother to even out the frosting, ensuring the dots are flush with the surface. For added flair, consider adding a sprinkle of edible glitter or pearl dust. Allow your cake to set in the fridge for at least an hour before serving.
Pro Tips
Creating a dot cake can be a rewarding experience with the right approach. Here are some expert tips to help you along the way.
- Ensure your cake is completely cool before applying any frosting or dots to prevent melting.
- Use gel food coloring for vibrant, consistent colors that won’t alter the texture of your icing or fondant.
- Practice your dot placement on a sheet of parchment paper before applying them to the cake for a more precise finish.
- If using icing, make sure it is thick enough to hold its shape when piped.
The most important tip is to enjoy the process. Cake decorating is an art, and each creation is unique. Don’t be afraid to experiment with different techniques and color combinations.
Love baking cakes like this one? 🎂
Get our newest cake recipes and seasonal baking ideas in your inbox every week. Free, no spam, unsubscribe anytime. See our Privacy Policy.
Serving Suggestions
Dot cakes are a versatile dessert that can be enjoyed on a variety of occasions. Consider pairing your cake with complementary beverages to enhance the experience.
Pairing with Beverages
For a refreshing contrast, serve your dot cake with a chilled glass of lemonade or a fruity iced tea. If you prefer something warm, a cup of coffee or a creamy chai latte can balance the sweetness of the cake beautifully. For more inspiration, check out Chai Spice Cake.
Occasions to Serve Dot Cake
Dot cakes are ideal for birthdays, baby showers, and even casual get-togethers. Their playful appearance makes them a hit at children’s parties. For more inspiration, check out our Ghost Cake and Christmas Sheet Cake recipes, which offer unique twists on celebration cakes.
If you’re looking for more cake ideas, explore external options like the Cranberry Orange Crumb Cake and Mini Pumpkin Coffee Cake Bites for delightful alternatives.
Nutritional Information
Calories and Macronutrients
Each slice of dot cake contains approximately 320 calories, with a balance of carbohydrates, proteins, and fats that make it a delightful treat. The cake is rich in flavor while providing a moderate portion size, making it a perfect choice for indulgence without overindulgence.
Allergen Information
Our dot cake contains common allergens, including eggs, dairy, and gluten. For those with dietary restrictions, consider substituting with allergen-free alternatives. Always check ingredient labels if you’re cooking for someone with food allergies.


Colorful Dot Cake

Equipment
- 1 9-inch round cake pan greased and floured
- 1 electric mixer
- 1 Mixing Bowl large
Ingredients
Dry Ingredients
- 2 cups all-purpose flour
- 1 tsp baking powder
Wet Ingredients
- 1/2 cup unsalted butter softened
- 2 large eggs room temperature
Instructions
Preparation
- Preheat the oven to 350°F. Grease and flour a 9-inch round cake pan. In a large bowl, mix the flour, baking powder, and salt. In another bowl, cream the butter and sugar until fluffy. Add eggs one at a time, then stir in vanilla.
- Gradually add the dry ingredients to the wet mixture, alternating with milk. Mix until the batter is smooth and pour into the prepared pan.
- Bake in the preheated oven for 45-50 minutes, or until a toothpick inserted into the center comes out clean. Let the cake cool completely before decorating.
Decorate
- Divide icing into separate bowls and tint with food coloring. Alternatively, use fondant rolled into small balls. Set aside.
- Frost the cooled cake with a thin layer of icing. Arrange colored dots in your desired pattern, pressing gently to adhere.
- Use a cake smoother to even out the frosting. Allow the cake to set in the refrigerator for at least an hour.
Serving
- Slice the cake into 8 pieces and serve with your choice of beverage.
Storage
- Store any leftover cake in an airtight container at room temperature for up to 2 days, or refrigerate for up to a week.
Notes
Ingredient Substitutions: Substitute butter with margarine for a dairy-free option.
How to Serve: Serve with a chilled beverage like lemonade or iced tea.
Storage & Freshness: Keep the cake in an airtight container to maintain freshness.
Make-Ahead Tips: You can bake the cake a day in advance and decorate it on the day of serving.
FAQ
Can I make the dot cake in advance?
Yes, you can bake the cake a day in advance. Store it in an airtight container at room temperature before decorating. This will allow you to focus on the decorating process on the day of your event. Just ensure the cake is completely cool before storing it to maintain its texture and freshness.
What is the best way to apply the dots on the cake?
The best way to apply the dots is to arrange them on a parchment paper first to plan out your design. Once satisfied, gently press each dot into the frosted cake. If using icing, pipe the dots directly onto the cake, ensuring the frosting beneath is firm enough to hold the shape. For fondant dots, lightly moisten the back to help them adhere.
Enjoyed this recipe? Leave a review!
There are no reviews yet. Be the first one to write one.

